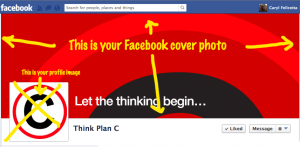
The ability to add a cover image to Facebook gives you an opportunity to brand your page, create calls to action, and present messages to your followers. It’s not hard to create, however you do need to know proper sizing and positioning with your profile image.

What is a Facebook cover photo? (I imagine you’re here because you already know, but…) It’s the large image at the very top of your personal or business Facebook page; it sits as a “background” to your profile image. Your profile picture is a separate image that overlays this larger photo. It is a public image – that is, anyone can see it even if you are not friends.
What’s the easiest way to create a Facebook cover photo?
Use the handy dandy Plan C Facebook Cover Photo Template for Photoshop. It’s a layered Photoshop document that I use every time I make a cover image for a Facebook page – and have shared with many others to do the same. It’s not brain surgery; it’s a simple template that will save you time and ensure accuracy.
Here’s how to create your Facebook cover photo in 5 easy steps
1. Click here to download the Facebook Cover Photo Template PSD file. (Right click and “Save as…”)
2. Open the file in Adobe Photoshop (or other app that will open layered PSD files). You’ll see a background layer and a layer showing the exact area for your profile image.
3. Open your main background image. (Here’s where you get creative – see tips at the end of this article.)
4. Drop in or cut and paste the image into the template file and position. (Note: it will be on it’s own layer so you can move it around in relation to the profile image.)
5. Satisfied with the results? Then TURN OFF the profile image layer (click the “eye” icon). Leaving it on will leave the gray box in your image – it’s only there for you to position; it should not be in the final image.
6. Finally, select File > Save for web… Typically a JPG will be the proper format however if you file is more solid color areas than a photographic image containing many colors and tones, then choose PNG.
That’s it. Just hover over your cover photo in Facebook, and the “Change Photo…” option will reveal. Upload it and you’re done. Sit back and smile – unless you hate it, then start over.
>> DOWNLOAD YOUR FACEBOOK COVER PHOTO TEMPLATE FOR PHOTOSHOP <<
Some additional tips:
– The actual Facebook cover photo size is 851 pixels wide by 315 pixels tall.
– The finished size of a Facebook profile image is 180 pixels by 180 pixels.
– There are some guidelines that Facebook recommends here – mostly relating to copyright.
– You can drop your profile picture into the Facebook Cover Photo Template to create a cover photo that results in two nicely aligned images when uploaded. Again, these need to be 2 separate files; this template is for the Facebook cover photo only and allows you to visualize the final alignment with your profile image.
– Consider something more than a “pretty picture” (unless of course, you’re in the business of “pretty pictures“). Your Facebook cover photo can direct users to take action, such as click on a tab, Like, etc.
– Change your cover image regularly to coincide with special events, promotions, or simply to keep friends interested.
– Don’t have Photoshop? Give Pixlr.com a try. It’s free!
More on this…Some creative ways to use Facebook Cover Photos
Facebook Timeline Cover: 40 (Really) Creative Examples at HONGKIAT.com
5 Ways to Turn your Facebook Cover Photo into a Call-to-Action that Converts
